Running a Quartz composition in your application
Updated Sept. 12th, 2008: make sure you don’t initWithOpenGLContext: a QCRenderer* outside of a @try…@catch block.
If you do this on a 16 MB or less PCI video card, this will throw an exception instead of just returning a nil object.
These video cards are not Quartz Extreme compatible.
Now that you have created a Quartz composition, you are probably wondering if you can somehow reuse this prototype in your production code (C, C++ or Objective-C).
For the purposes of this demo, it is assumed that you have an application written in C++ using Carbon. Cocoa applications can simplify this code as needed, for instance they may not need a local NSAutoreleasePool.
The Hard Way
Quartz Composer is a GUI on top of the Core Image filter library. Everything you see in QC represents one or more of the basic Core Image filters.
Technically, nothing prevents you from re-writing the composition by writing procedural code. Given an image img, you can:
- Load a CIFilter
- Set its parameters, including input image img
- Apply the filter
- Get the new image img2
- Unload the filter (if necessary)
- Repeat with img2 and a new filter…
This is tedious, error-prone and hard to maintain.
You already did all the creative work in Quartz Composer, why not let Quartz Composer do the heavy lifting for you?
The easy way
When you think about it, our composition requires two pieces of data:
- A source image to operate on
- A place to store the resulting image
If you were to treat a composition as a black box, the function prototype would probably look something like this:
CGImageRef ApplyQuartzComposition(const char* compositionName, const CGImageRef srcImage);
Pretty simple so far! Copy this in a header file (QuartzComposer.h, for instance) and add it to your application.
A small addition
As-is, our composition cannot be used. You will make some minor modifications to it to help run it from our application.
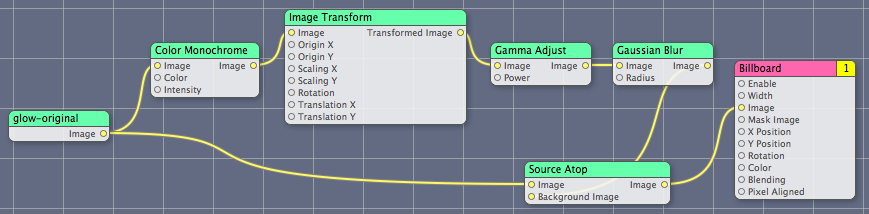
First, you will add an intermediate, “do-nothing” image transformation.
- Disconnect your source image from the “Color Monochrome” and “Source Atop” filters, by dragging the tail end of the connexion away from the little dot labeled “Image”.
The glowing image should disappear from the output window. This is expected.
- Drag an “Image Transform” patch from the patch list into your composition
- Do not change the default parameters of this new patch. We simply want a “do-nothing” transformation.
- Connect the source image to the “Image” input (on the left) of the new Image Transform patch
- Connect the “Transformed Image” output of the new Image Transform patch to both the Color Monochrome, and Source Atop patches.
The glowing image should re-appear in the output window.
When you are done, you should have something like this:

Published outlets
The last thing to do is to to indicate in our composition where the source image is set, and where the resulting image can be copied.
If you control-click on any patch element of a composition, a contextual menu with the text “Published Inputs” and “Published Outputs” will appear. They will be disabled if there are no inputs or outputs. For instance, the source image you dragged in (on the left) has no inputs, and a Billboard has no outputs.
Using this technique, change the name of the published input “Image” of the Image Transform patch to “SourceImage”. The input’s name should now be “SourceImage” (with quotes), indicating that it is now a “named” input.
But my picture disappeared!
Right. As soon as you named the Input, the image was disconnected because a Quartz Composition cannot accept multiple inputs. It’s either a named input, or a connexion. This is expected.
Finally, name the output image of the “Source Atop” patch to “OutputImage”. Notice that the link to the Billboard was not severed, because outputs can be split.
Save your composition, with its named inputs and output, to a file called Glow.qtz.
Adding the composition to your application as a resource
Your application is probably built in Xcode, in which case you have a “Copy Resources” build phase. Simply add the Composition Glow.qtz to your project as a resource, and make sure it is added to this Copy phase. When you build your application, check the Contents/Resources folder in your bundle: the composition should have been copied there.
Actual code
You declared a function called ApplyQuartzComposition(const char*, const CGImageRef) above. Here is the code to this function:
#import "QuartzComposer.h"
#import <Quartz/Quartz.h>

CGImageRef ApplyQuartzComposition(const char* compositionName, CGImageRef srcImage)
{
  // Start with no image
  CGImageRef resultImage = NULL;

  // If you have a Cocoa application, you don't need an autorelease pool,
  // but having an extra one does not hurt because pools can be nested.
  NSAutoreleasePool* pool = [NSAutoreleasePool new];

  // Load the Quartz Composition by name. You copied it to your app's Resources folder above.
  NSString* compName = [NSString stringWithCString:compositionName];
  NSString* compositionPath =  [[NSBundle mainBundle] pathForResource:compName ofType:@"qtz"];

  // Quartz Compositions are run in an OpenGL context. Here's how to declare one.
  // This code inspired by http://lists.apple.com/archives/Quartzcomposer-dev/2005/May//msg00136.html
  NSOpenGLPixelFormatAttribute attributes[] = {NSOpenGLPFAAccelerated, NSOpenGLPFANoRecovery, (NSOpenGLPixelFormatAttribute)0};
  NSOpenGLPixelFormat* format = [[NSOpenGLPixelFormat alloc] initWithAttributes:attributes];
  NSOpenGLContext* context = [[NSOpenGLContext alloc] initWithFormat:format shareContext:nil];

  // We use Objective-C exceptions because if:
  // - there is no context (which happens on a non-Quartz-Extreme graphics card), or
  // - you forgot to name your inputs and outputs, or
  // - you made a typo (hence they are not found),
  // an exception is thrown and we want to catch it and return a NULL image.
  @try
  {
    // Create the Renderer object that will play back our composition
    QCRenderer* renderer = [[QCRenderer alloc] initWithOpenGLContext:context pixelFormat:format file:compositionPath];
    // Set input values. You could get a complete list with [renderer inputKeys].
    [renderer setValue:(id)srcImage forInputKey:@"SourceImage"];
    // Run composition. Finally!
    [renderer renderAtTime:0.0 arguments:nil];
    // Retrieve composition output results. You could get a complete list of outputs with [renderer outputKeys].
    NSImage* image = [renderer valueForOutputKey:@"OutputImage"];
    if (image)
    {
      // Convert NSImage to CGImageRef, our return type
      CFDataRef imgData = (CFDataRef)[image TIFFRepresentation];
      CGImageSourceRef imageSourceRef = CGImageSourceCreateWithData(imgData, NULL);
      resultImage = CGImageSourceCreateImageAtIndex(imageSourceRef, 0, NULL);
    }
    [renderer release];
  }
  @catch(id exception)
  {
    NSLog(@"Error running Quartz Composition '%s': %@", compositionName, exception);
  }

  // Done, clean up
 [context release];
  [format release];
  [pool release];

  return resultImage;
}
Copy this to a source file (QuartzComposer.mm, for instance) and add it to your application.
You should now be able to apply a Quartz Composition by name in your application. Enjoy!
