Creating a Glow effect using Quartz Composer
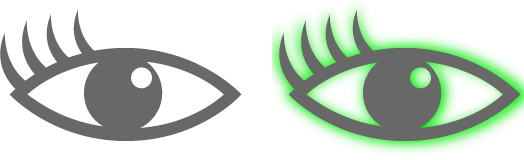
Say you have an image behind which you want to add a colored “glow”:
Recipe
Apple has a tutorial about this, but you can also do it with a bitmap editor such as Acorn. The recipe is:
- Copy your image to a separate layer
- Make the original image monochrome (in my case, green)
- Inflate the monochrome image slightly (in my case, by 1.05)
- (Optional *) Adjust the gamma value (in my case, 0.377)
- Finally, apply a Gaussian blur to the image.
(*) The gamma value is the digital equivalent of “turning up the brightness” on CRT monitors
Voilà! Simple as pie.
Caveat
You can’t start doing this for every image. First, it takes time to do (tying up your graphic designer), and second, you would have to store one glow per image, at every resolution. That’s not going to fly with your downloadable product (bandwidth is money).
This is not very hard to code. But it is:
- Harder to prototype: compile»link»debug»fix»rebuild…
- Harder to maintain: if you want to change the glow color, or the blur radius, you have to rebuild your app.
Right now, you are probably feeling pretty good about coding this. Converting to monochrome and blurring are Computer Graphics 101. But what if your boss (or your customers) request a more complex effect? Will you prototype it in code? Or in Acorn?
Quartz Composer to the rescue!
Open /Developer/Applications/Quartz Composer.app and create a blank composition. Drag in the original image, for instance, the left image above. Activate the Patch Creator (Edit»Show Patch Creator) and add the following patches:
- Filter, Color Monochrome
- Modifier, Image Transform
- Filter, Gamma Adjust
- Filter, Gaussian Blur
- Composite, Source Atop
- Renderer, Billboard
Looks fairly similar to the Recipe, doesn’t it?
Putting it all together…
You have a jumbled mess of patches in your Editor window, but you need to connect them in a meaningful way. Just follow the Recipe and connect:
- The source image’s “Image” output (it’s the only output) to Color Monochrome’s “Image” input (top-left)
- Color Monochrome’s “Image” output (top-right) to Image Transform’s “Image” input (top-left)
- etc… (do you sense a pattern?)
After connecting all the patches, you should have something like this:
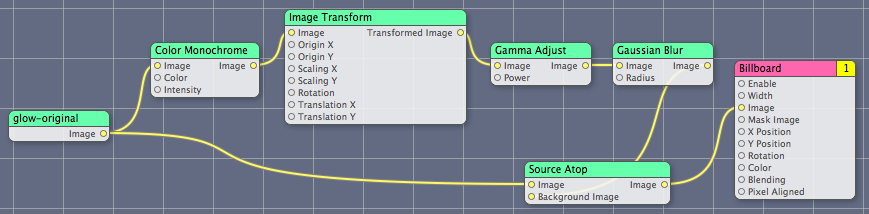
The Image output from Gaussian Blur is connected to the Background of Source Atop. And the Billboard is necessary to view the resulting image.
The glowing image should appear in your Viewer window (Window»Show Viewer). Go ahead and adjust all the parameters to your liking with the Inspector (Editor»Show Inspector), clicking on each patch to select it.
You’re done!
Play around with the patches, add some more, change the Composition to Addition instead of Source Atop. And save your masterpiece, because in the next post, you will learn how to use it as a resource in your application.