Archive

Archive for the ‘Graphics’ Category

Day Two: iChibi and ImageSoup

April 20th, 2009 Comments off

Six Days of Cocoa: Day Two

Day Two: code-name iChibi

My whole family is very much into all things japanese (including, of course, manga and anime). The other day, they found a little “sound-playing ghost” called Flele (I have no idea what the name means).

As far as I can tell, Flele is a small application that you drop one or more MP3s on, and it starts to “sing” when you click on the character’s hair. I have no idea how it actually works, since it requires Windows and the Japanese language pack. But my daughter and I quickly hashed out that what we could do would be a globally-floating iTunes controller, who would respond to click and animate when music was playing (we’ll figure out the “singing” part later).

iChibi

My daughter drew lots of PNGs this weekend (using Painter, of course), and we assembled them in sequences to make animations. The iChibi can blink, and lights turn on/off on its headphones whenever music is playing.

iChibi can be dragged anywhere on screen, and will float on top of all windows.

Clicking on its left ear starts playing in iTunes, on the right ear stops playing. The left headphone goes to the previous track, the right headphone to the next track.

Clicking on the zipper gives a Settings panel, where you can control the its size, opacity and which playlist the songs are coming from.

The higher the song rating, the happier it will look.

iTunes support is done through the excellent Eyetunes Framework.

iChibi works on MacOSX 10.5 and later.

If you are interested in following the development of iChibi, follow @ichibiapp on Twitter.


ImageSoup

Since iChibi uses lots of images for animations, and I didn’t want to keep multiple copies of the same image in memory (for example, if an image is re-used in multiple animation loops), I figured I should make a small class to hold all the images, loading them as necessary. I named this class ImageSoup, referring to the Newton’s filesystem of course…

ImageSoup is very simple, and does not need to be its own class (after all, it’s a dictionary). But it is nice to be able to abstract that implementation detail out of your code, as well as the image-loading code. What if your source image was an Acorn image or a Painter RIFF? You could hide the image-loading code in ImageSoup, and your calling code need not be aware of this.

To use ImageSoup, just create an ImageSoup* instance and always ask it to load your images (using the full path to the image):

#import "ImageSoup.h"

[...]

ImageSoup* allImages = [[ImageSoup alloc] init];

[...]

NSImage* myImage = [allImages getImageAtPath: @"Full/path/to/image"];

If the image exists and has been loaded previously, ImageSoup will return it right away. If the image does not exist, ImageSoup will load it and store it for future reference.

When you release your ImageSoup*, all its images will be released.

ImageSoup.h

//
//  ImageSoup.h
//  iChibi
//
//  Created by Philippe on 09-04-19.
//  Copyright 2009 Philippe Casgrain. All rights reserved.
//

#import <Cocoa/Cocoa.h>

@interface ImageSoup : NSObject
{
  NSMutableDictionary* _images;
}

- (NSImage*) getImageAtPath: (NSString*) path;

@end

ImageSoup.m

//
//  ImageSoup.m
//  iChibi
//
//  Created by Philippe on 09-04-19.
//  Copyright 2009 Philippe Casgrain. All rights reserved.
//

#import "ImageSoup.h"

@implementation ImageSoup

- (id) init
{
  self = [super init];
  if (self != nil) 
  {
    _images = [[NSMutableDictionary dictionaryWithCapacity: 0] retain];
  }
  return self;
}

- (void) dealloc
{
  [_images removeAllObjects];
  [_images release];
  [super dealloc];
}


- (NSImage*) getImageAtPath: (NSString*) path
{
  NSImage* retrievedImage = [_images valueForKey: path];
  if (retrievedImage == nil)
  {
    NSImage* image = [[NSImage alloc] initWithContentsOfFile: path];
    if (image)
      [_images setObject: image forKey: path];
    [image release];
    retrievedImage = image;
  }
  return retrievedImage;
}

@end
Categories: Graphics, Leopard, Six Days of Cocoa Tags:

Search Paths for QuickLook plugins

May 27th, 2008 Comments off

You can debug your QuickLook plugin easily with the help of qlmanage. But sometimes, you don’t want to dump your plugin in /Library/QuickLook/ every time you build because you run as a regular (non-admin) user.

QuickLook has a search path feature. You can set the search order, and in my case I use my two build folders (Debug and Release) before the main /Library/QuickLook/ folder. It is a global, per-user property (hence the -g), and as far as I know, the array can contain as many values as you want

defaults write -g QLGeneratorSearchPath -array "/Volumes/DevSource/xcodebuild/Debug" \
                                               "/Volumes/DevSource/xcodebuild/Release/" \
                                               "/Library/QuickLook/"

It’s probably a good idea to leave /Library/QuickLook/ in there as the last element of the array.

If you want to delete the search path, simply type:

defaults delete -g QLGeneratorSearchPath

This does not seem to be documented, but it works for me; as usual, YMMV…

Categories: Graphics, Leopard Tags:

Pimp my IKImageBrowserView: Slide Show

March 27th, 2008 7 comments

After listening to Frasier Speirs on Late Night Cocoa, I decided to take a look at ImageKit, a new Leopard-only technology that contains the most interesting parts of iPhoto.

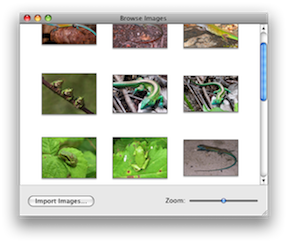
I had a need for an Image Browser, so I tried the (very well-written) Browsing Images Programming Guide. At the tutorial’s end, I had a “Browse Images” application:

If you haven’t done so, you can do this tutorial too. I will wait until you’re done…

All done? Great. I wanted some extras in “Browse Images”, for example a slideshow and a filter. There is a guide to build a slideshow application, but it makes you write a separate application. We already have “Browse Images”, surely we can re-use it?

Adding a slideshow

The IKSlideShow class is very simple. One call makes it all happen:

[[IKSlideshow sharedSlideshow] runSlideshowWithDataSource: (id) self inMode: IKSlideshowModeImages options: nil]

The objects have to implement the IKSlideshowDataSource protocol, which requires at least two methods:

	- (NSUInteger) numberOfSlideshowItems
	- (id) slideshowItemAtIndex: (NSUInteger) index

That looks familiar. For the IKImageBrowserDataSource protocol, we already implemented similar methods:

- (int) numberOfItemsInImageBrowser: (IKImageBrowserView*) view
{
	return [mImages count];
}

- (id) imageBrowser: (IKImageBrowserView*) view itemAtIndex: (int) index
{
	return [mImages objectAtIndex: index];
}

The only difference is the objects returned by (id) imageBrowser: itemAtIndex: had to implement the IKImageBrowserItem protocol, but they still returned an NSString*, a path to the image file.

(Another difference is the objects could be of more image types, but we will leave that for another time.)

Implementing the IKSlideshowDataSource protocol

In your ImageBrowserController implementation, add the missing methods to make the slide show work:

- (NSUInteger) numberOfSlideshowItems
{
	return [mImages count];
}

- (id) slideshowItemAtIndex: (NSUInteger) index
{
	int i = index % [mImages count];

	return [[mImages objectAtIndex: i] path]; // path? Where did that come from?
}

The first method is the same as before, while the second one returns not a MyImageObject (what is stored in mImages), but the path of that object. To get this path, simply add an accessor to MyImageObject:

- (NSString*) path 
{ 
	return mPath;
}

(Also add the prototype to the interface, lest you get a warning…)

Tying it together in Interface Builder

Now that our controller conforms to the IKSlideshowDataSource protocol, we need a way to start the slide show. To this end, create an IBAction in the controller’s interface, and implement it like this:

- (IBAction) startSlideshow: (id) sender
{
	if ([mImages count] > 0)
	{
		[[IKSlideshow sharedSlideshow] runSlideshowWithDataSource: (id) self inMode: IKSlideshowModeImages options: nil];
	}
}

Create a button in Interface Builder, and Control-drag it to your controller to connect it to the startSlideShow: action (IB 3 should have automatically picked up the change in your header file and offer you the new action).

Build and run. You should be able to browse pictures like before, and pressing on the “Slideshow” button should start a full-screen slideshow, complete with index sheet.

Categories: Graphics, Leopard, MacOSX Tags:

Updating your Twitter Avatar from Acorn

March 19th, 2008 7 comments

If you are on Twitter, chances are that you have one avatar that you never update because there is nothing in Twitter’s API to access that part of your profile.

I have written a pair of script for Acorn that will allow you to do this.


Warning:I have tested this on Leopard 10.5.2, with ruby 1.8.6. It works for me. YMMV.

  1. Download the two scripts here, and put them in ~/Library/Application Support/Acorn/Plug-Ins/

    The archive contains a python script (which Acorn will load) and a helper ruby script to do the heavy lifting.

  2.  

  3. Important! Customize the Twitter.py script with your twitter username and password.

    Maybe I will update the script to have a real UI for this, or simply use the keychain. This is a quick-and-dirty hack.

  4.  

  5. Install the mechanize ruby gem, if you don’t already have it: 
    % sudo gem install mechanize
  6.  

  7. Launch Acorn. Open an image. Edit it (crop it, etc…). You should be able to send it to Twitter by selecting File->Actions->Save as Twitter Avatar (by default, Control-Command-T).

That’s it! Share and enjoy!

Categories: Graphics Tags:

Running a Quartz composition in your application

February 27th, 2008 9 comments

Updated Sept. 12th, 2008: make sure you don’t initWithOpenGLContext: a QCRenderer* outside of a @try…@catch block.
If you do this on a 16 MB or less PCI video card, this will throw an exception instead of just returning a nil object.
These video cards are not Quartz Extreme compatible.

Now that you have created a Quartz composition, you are probably wondering if you can somehow reuse this prototype in your production code (C, C++ or Objective-C).

For the purposes of this demo, it is assumed that you have an application written in C++ using Carbon. Cocoa applications can simplify this code as needed, for instance they may not need a local NSAutoreleasePool.

The Hard Way

Quartz Composer is a GUI on top of the Core Image filter library. Everything you see in QC represents one or more of the basic Core Image filters.

Technically, nothing prevents you from re-writing the composition by writing procedural code. Given an image img, you can:

  • Load a CIFilter
  • Set its parameters, including input image img
  • Apply the filter
  • Get the new image img2
  • Unload the filter (if necessary)
  • Repeat with img2 and a new filter…

This is tedious, error-prone and hard to maintain.

You already did all the creative work in Quartz Composer, why not let Quartz Composer do the heavy lifting for you?

The easy way

When you think about it, our composition requires two pieces of data:

  1. A source image to operate on
  2. A place to store the resulting image

If you were to treat a composition as a black box, the function prototype would probably look something like this:


CGImageRef ApplyQuartzComposition(const char* compositionName, const CGImageRef srcImage);

Pretty simple so far! Copy this in a header file (QuartzComposer.h, for instance) and add it to your application.

A small addition

As-is, our composition cannot be used. You will make some minor modifications to it to help run it from our application.

First, you will add an intermediate, “do-nothing” image transformation.

  • Disconnect your source image from the “Color Monochrome” and “Source Atop” filters, by dragging the tail end of the connexion away from the little dot labeled “Image”.

    The glowing image should disappear from the output window. This is expected.

  • Drag an “Image Transform” patch from the patch list into your composition
  • Do not change the default parameters of this new patch. We simply want a “do-nothing” transformation.
  • Connect the source image to the “Image” input (on the left) of the new Image Transform patch
  • Connect the “Transformed Image” output of the new Image Transform patch to both the Color Monochrome, and Source Atop patches.

    The glowing image should re-appear in the output window.

When you are done, you should have something like this:

Published outlets

The last thing to do is to to indicate in our composition where the source image is set, and where the resulting image can be copied.

If you control-click on any patch element of a composition, a contextual menu with the text “Published Inputs” and “Published Outputs” will appear. They will be disabled if there are no inputs or outputs. For instance, the source image you dragged in (on the left) has no inputs, and a Billboard has no outputs.

Using this technique, change the name of the published input “Image” of the Image Transform patch to “SourceImage”. The input’s name should now be “SourceImage” (with quotes), indicating that it is now a “named” input.

But my picture disappeared!

Right. As soon as you named the Input, the image was disconnected because a Quartz Composition cannot accept multiple inputs. It’s either a named input, or a connexion. This is expected.

Finally, name the output image of the “Source Atop” patch to “OutputImage”. Notice that the link to the Billboard was not severed, because outputs can be split.

Save your composition, with its named inputs and output, to a file called Glow.qtz.

Adding the composition to your application as a resource

Your application is probably built in Xcode, in which case you have a “Copy Resources” build phase. Simply add the Composition Glow.qtz to your project as a resource, and make sure it is added to this Copy phase. When you build your application, check the Contents/Resources folder in your bundle: the composition should have been copied there.

Actual code

You declared a function called ApplyQuartzComposition(const char*, const CGImageRef) above. Here is the code to this function:

#import "QuartzComposer.h"
#import <Quartz/Quartz.h>

CGImageRef ApplyQuartzComposition(const char* compositionName, CGImageRef srcImage)
{
  // Start with no image
  CGImageRef resultImage = NULL;

  // If you have a Cocoa application, you don't need an autorelease pool,
  // but having an extra one does not hurt because pools can be nested.
  NSAutoreleasePool* pool = [NSAutoreleasePool new];

  // Load the Quartz Composition by name. You copied it to your app's Resources folder above.
  NSString* compName = [NSString stringWithCString:compositionName];
  NSString* compositionPath =  [[NSBundle mainBundle] pathForResource:compName ofType:@"qtz"];

  // Quartz Compositions are run in an OpenGL context. Here's how to declare one.
  // This code inspired by http://lists.apple.com/archives/Quartzcomposer-dev/2005/May//msg00136.html
  NSOpenGLPixelFormatAttribute attributes[] = {NSOpenGLPFAAccelerated, NSOpenGLPFANoRecovery, (NSOpenGLPixelFormatAttribute)0};
  NSOpenGLPixelFormat* format = [[NSOpenGLPixelFormat alloc] initWithAttributes:attributes];
  NSOpenGLContext* context = [[NSOpenGLContext alloc] initWithFormat:format shareContext:nil];

  // We use Objective-C exceptions because if:
  // - there is no context (which happens on a non-Quartz-Extreme graphics card), or
  // - you forgot to name your inputs and outputs, or
  // - you made a typo (hence they are not found),
  // an exception is thrown and we want to catch it and return a NULL image.
  @try
  {
    // Create the Renderer object that will play back our composition
    QCRenderer* renderer = [[QCRenderer alloc] initWithOpenGLContext:context pixelFormat:format file:compositionPath];
    // Set input values. You could get a complete list with [renderer inputKeys].
    [renderer setValue:(id)srcImage forInputKey:@"SourceImage"];
    // Run composition. Finally!
    [renderer renderAtTime:0.0 arguments:nil];
    // Retrieve composition output results. You could get a complete list of outputs with [renderer outputKeys].
    NSImage* image = [renderer valueForOutputKey:@"OutputImage"];
    if (image)
    {
      // Convert NSImage to CGImageRef, our return type
      CFDataRef imgData = (CFDataRef)[image TIFFRepresentation];
      CGImageSourceRef imageSourceRef = CGImageSourceCreateWithData(imgData, NULL);
      resultImage = CGImageSourceCreateImageAtIndex(imageSourceRef, 0, NULL);
    }
    [renderer release];
  }
  @catch(id exception)
  {
    NSLog(@"Error running Quartz Composition '%s': %@", compositionName, exception);
  }

  // Done, clean up
 [context release];
  [format release];
  [pool release];
  
  return resultImage;
}
  

Copy this to a source file (QuartzComposer.mm, for instance) and add it to your application.

You should now be able to apply a Quartz Composition by name in your application. Enjoy!

Categories: Carbon+Cocoa, Development, Graphics Tags:

Creating a Glow effect using Quartz Composer

February 9th, 2008 Comments off

Say you have an image behind which you want to add a colored “glow”:

Recipe

Apple has a tutorial about this, but you can also do it with a bitmap editor such as Acorn. The recipe is:

  • Copy your image to a separate layer
  • Make the original image monochrome (in my case, green)
  • Inflate the monochrome image slightly (in my case, by 1.05)
  • (Optional *) Adjust the gamma value (in my case, 0.377)
  • Finally, apply a Gaussian blur to the image.

(*) The gamma value is the digital equivalent of “turning up the brightness” on CRT monitors

Voilà! Simple as pie.

Caveat

You can’t start doing this for every image. First, it takes time to do (tying up your graphic designer), and second, you would have to store one glow per image, at every resolution. That’s not going to fly with your downloadable product (bandwidth is money).

This is not very hard to code. But it is:

  • Harder to prototype: compile»link»debug»fix»rebuild…
  • Harder to maintain: if you want to change the glow color, or the blur radius, you have to rebuild your app.

Right now, you are probably feeling pretty good about coding this. Converting to monochrome and blurring are Computer Graphics 101. But what if your boss (or your customers) request a more complex effect? Will you prototype it in code? Or in Acorn?

Quartz Composer to the rescue!

Open /Developer/Applications/Quartz Composer.app and create a blank composition. Drag in the original image, for instance, the left image above. Activate the Patch Creator (Edit»Show Patch Creator) and add the following patches:

  • Filter, Color Monochrome
  • Modifier, Image Transform
  • Filter, Gamma Adjust
  • Filter, Gaussian Blur
  • Composite, Source Atop
  • Renderer, Billboard

Looks fairly similar to the Recipe, doesn’t it?

Putting it all together…

You have a jumbled mess of patches in your Editor window, but you need to connect them in a meaningful way. Just follow the Recipe and connect:

  • The source image’s “Image” output (it’s the only output) to Color Monochrome’s “Image” input (top-left)
  • Color Monochrome’s “Image” output (top-right) to Image Transform’s “Image” input (top-left)
  • etc… (do you sense a pattern?)

After connecting all the patches, you should have something like this:

The Image output from Gaussian Blur is connected to the Background of Source Atop. And the Billboard is necessary to view the resulting image.

The glowing image should appear in your Viewer window (Window»Show Viewer). Go ahead and adjust all the parameters to your liking with the Inspector (Editor»Show Inspector), clicking on each patch to select it.

You’re done!

Play around with the patches, add some more, change the Composition to Addition instead of Source Atop. And save your masterpiece, because in the next post, you will learn how to use it as a resource in your application.

Categories: Development, Graphics Tags: