Archive

Archive for the ‘MacOSX’ Category

AvatarManager is Open Source

February 18th, 2009 Comments off

What is it?

Around the time of c4[2] I was futzing around with making a proper UI for my Twitter Avatar Acorn script.

I also wanted to learn about Core Data and Image Kit.

So I wrote AvatarManager, which uses Core Data to store images in png, tiff or jpg format and displays them in an ImageKit view. People suggested that it should not be limited to Twitter (which is my main Social Network app), so I made a pop-up menu populated by scripts that are run as an NSTask by the app. The scripts provide the interface to the image-upload interface of your on-line service.

Things change

Unfortunately, the Twitter “API” got modified and my script broke, so I lost interest. I was using Ruby’s ‘mechanize’ module to essentially script my way in the web page, which is an interesting way of doing it.

It’s still a good project!

I think the app is a good starting point: it’s simple, robust and extensible. The source code is easy to understand, and it shows how to use the Keychain (to store your passwords) and NSTasks.

You can help!

Grab a copy of the code and hack away! Patches welcome. Especially if you have new and updated upload scripts.

hg clone http://bitbucket.org/philippec/avatarmanager

Requirements

  • MacOSX 10.5 (Leopard)
  • Xcode 3
Categories: Development, Leopard, MacOSX Tags:

Desktop Core Location

September 8th, 2008 20 comments

Update 18/Feb/09 @ 19:45 EST: Source code is on BitBucket.org:

hg clone http://bitbucket.org/philippec/desktopcorelocation

Update 5/Feb/09 @ 12:43 EST: It appears that Apple may implement CoreLocation in their next generation desktop OS. Excellent!.

Update 8/Sep/08 @ 22:40 EST: The license is MIT. Share and enjoy!.

Update 8/Sep/08 @ 21:45 EST: This is an IronCoder entry, and is essentially a hack. I’m working on figuring out a license.

My IronCoder entry for c4[2]: a clean-room implementation of Apple’s CoreLocation.framework, complete with sample application.

http://developer.casgrain.com/files/DesktopCoreLocation.zip

Description

This is a clean-room implementation of Apple’s CoreLocation framework that is part of the iPhone SDK.

It uses Apple’s own headers, which are installed when you install the iPhone SDK, as the interface, and implements all the functionality of CoreLocation in an embeddable framework.

It can be made a system-wide framework buy changing its executable path from @loader_path/../Frameworks/ to /Library/Frameworks.

The Desktop and Phone sample applications are very similar: they both demonstrate using CoreLocation.framework.

How it works

The framework figures out your current, internet-facing IP address using whatismyip.com. It then uses basic IP Geolocation web services to extract latitude and longitude. Results are cached 30 days for each IP address.

There are certainly other IP geolocation services (for instance, SkyHook Wireless) but they required a paid license.

Paranoïa

In keeping with the theme, you can drop a file called unauthorizedApps in /Library/Documents/WebServer/clbl/ and start your webserver. You can then edit the file at will to deny a particular app the use of CoreLocation.

Contents

PhoneLocation/PhoneLocation.xcodeproj
Sample application that demonstrates using CoreLocation on the iPhone/iPod Touch.
Build and go, it will find your current location (which, in the Simulator, is 1, Infinite Loop, Cupertino, CA). Press the “Show Me” button to go to these coordinates in Google Maps.

DesktopLocation/DesktopLocation.xcodeproj
Sample application that demonstrates using CoreLocation on the Desktop. It uses the Desktop CoreLocation framework in exactly the same manner as PhoneLocation, but the results are pulled from my version of the framework.
Press the “Show Me” button to go to these coordinates in Google Maps.

CoreLocation/CoreLocation.xcodeproj
Stand-alone, embeddable framework

Requirements

  • MacOSX 10.5
  • Latest iPhone SDK. Does not contain any Apple proprietary information.
  • Internet connexion
Categories: Development, MacOSX Tags:

Quickie: MAKE_NSSTRING and plist preprocessing

July 24th, 2008 Comments off

Plist pre-processing is a very useful feature of Xcode. Basically, you define strings and numbers in a header file, which can also be included in your source code:

#define SimpleProductName "My Plugin"
#define MacBundleIdentifier com.myCompany.MyPlugin

Your Info.plist should contain:

[...]
	<key>CFBundleExecutable</key>
	<string>SimpleProductName</string>
	<key>CFBundleIdentifier</key>
	<string>MacBundleIdentifier</string>
[...]

This is great, but what if you want to do this:

NSBundle* myBundle = [NSBundle bundleWithIdentifier: MacBundleIdentifier];

You can’t: MacBundleIdentifier is not an NSString, and you want to avoid duplication (a maintenance problem) with @"com.myCompany.MyPlugin"


MAKE_NSSTRING

Simply define these two macros:

#define MAKE_STRING(x) #x
#define MAKE_NSSTRING(x) @MAKE_STRING(x)

MAKE_STRING uses the C preprocessor to put quotes around whatever you pass it. So com.myCompany.MyPlugin becomes "com.myCompany.MyPlugin".

Finally, MAKE_NSSTRING converts com.myCompany.MyPlugin to @"com.myCompany.MyPlugin". Problem solved!

NSBundle* myBundle = [NSBundle bundleWithIdentifier: MAKE_NSSTRING(MacBundleIdentifier)];
Categories: Development, MacOSX, Quickie Tags:

Search Paths for QuickLook plugins

May 27th, 2008 Comments off

You can debug your QuickLook plugin easily with the help of qlmanage. But sometimes, you don’t want to dump your plugin in /Library/QuickLook/ every time you build because you run as a regular (non-admin) user.

QuickLook has a search path feature. You can set the search order, and in my case I use my two build folders (Debug and Release) before the main /Library/QuickLook/ folder. It is a global, per-user property (hence the -g), and as far as I know, the array can contain as many values as you want

defaults write -g QLGeneratorSearchPath -array "/Volumes/DevSource/xcodebuild/Debug" \
                                               "/Volumes/DevSource/xcodebuild/Release/" \
                                               "/Library/QuickLook/"

It’s probably a good idea to leave /Library/QuickLook/ in there as the last element of the array.

If you want to delete the search path, simply type:

defaults delete -g QLGeneratorSearchPath

This does not seem to be documented, but it works for me; as usual, YMMV…

Categories: Graphics, Leopard Tags:

Pimp my IKImageBrowserView: Slide Show

March 27th, 2008 7 comments

After listening to Frasier Speirs on Late Night Cocoa, I decided to take a look at ImageKit, a new Leopard-only technology that contains the most interesting parts of iPhoto.

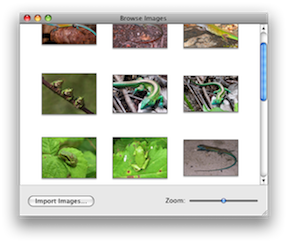
I had a need for an Image Browser, so I tried the (very well-written) Browsing Images Programming Guide. At the tutorial’s end, I had a “Browse Images” application:

If you haven’t done so, you can do this tutorial too. I will wait until you’re done…

All done? Great. I wanted some extras in “Browse Images”, for example a slideshow and a filter. There is a guide to build a slideshow application, but it makes you write a separate application. We already have “Browse Images”, surely we can re-use it?

Adding a slideshow

The IKSlideShow class is very simple. One call makes it all happen:

[[IKSlideshow sharedSlideshow] runSlideshowWithDataSource: (id) self inMode: IKSlideshowModeImages options: nil]

The objects have to implement the IKSlideshowDataSource protocol, which requires at least two methods:

	- (NSUInteger) numberOfSlideshowItems
	- (id) slideshowItemAtIndex: (NSUInteger) index

That looks familiar. For the IKImageBrowserDataSource protocol, we already implemented similar methods:

- (int) numberOfItemsInImageBrowser: (IKImageBrowserView*) view
{
	return [mImages count];
}

- (id) imageBrowser: (IKImageBrowserView*) view itemAtIndex: (int) index
{
	return [mImages objectAtIndex: index];
}

The only difference is the objects returned by (id) imageBrowser: itemAtIndex: had to implement the IKImageBrowserItem protocol, but they still returned an NSString*, a path to the image file.

(Another difference is the objects could be of more image types, but we will leave that for another time.)

Implementing the IKSlideshowDataSource protocol

In your ImageBrowserController implementation, add the missing methods to make the slide show work:

- (NSUInteger) numberOfSlideshowItems
{
	return [mImages count];
}

- (id) slideshowItemAtIndex: (NSUInteger) index
{
	int i = index % [mImages count];

	return [[mImages objectAtIndex: i] path]; // path? Where did that come from?
}

The first method is the same as before, while the second one returns not a MyImageObject (what is stored in mImages), but the path of that object. To get this path, simply add an accessor to MyImageObject:

- (NSString*) path 
{ 
	return mPath;
}

(Also add the prototype to the interface, lest you get a warning…)

Tying it together in Interface Builder

Now that our controller conforms to the IKSlideshowDataSource protocol, we need a way to start the slide show. To this end, create an IBAction in the controller’s interface, and implement it like this:

- (IBAction) startSlideshow: (id) sender
{
	if ([mImages count] > 0)
	{
		[[IKSlideshow sharedSlideshow] runSlideshowWithDataSource: (id) self inMode: IKSlideshowModeImages options: nil];
	}
}

Create a button in Interface Builder, and Control-drag it to your controller to connect it to the startSlideShow: action (IB 3 should have automatically picked up the change in your header file and offer you the new action).

Build and run. You should be able to browse pictures like before, and pressing on the “Slideshow” button should start a full-screen slideshow, complete with index sheet.

Categories: Graphics, Leopard, MacOSX Tags:

Running a Quartz composition in your application

February 27th, 2008 9 comments

Updated Sept. 12th, 2008: make sure you don’t initWithOpenGLContext: a QCRenderer* outside of a @try…@catch block.
If you do this on a 16 MB or less PCI video card, this will throw an exception instead of just returning a nil object.
These video cards are not Quartz Extreme compatible.

Now that you have created a Quartz composition, you are probably wondering if you can somehow reuse this prototype in your production code (C, C++ or Objective-C).

For the purposes of this demo, it is assumed that you have an application written in C++ using Carbon. Cocoa applications can simplify this code as needed, for instance they may not need a local NSAutoreleasePool.

The Hard Way

Quartz Composer is a GUI on top of the Core Image filter library. Everything you see in QC represents one or more of the basic Core Image filters.

Technically, nothing prevents you from re-writing the composition by writing procedural code. Given an image img, you can:

  • Load a CIFilter
  • Set its parameters, including input image img
  • Apply the filter
  • Get the new image img2
  • Unload the filter (if necessary)
  • Repeat with img2 and a new filter…

This is tedious, error-prone and hard to maintain.

You already did all the creative work in Quartz Composer, why not let Quartz Composer do the heavy lifting for you?

The easy way

When you think about it, our composition requires two pieces of data:

  1. A source image to operate on
  2. A place to store the resulting image

If you were to treat a composition as a black box, the function prototype would probably look something like this:


CGImageRef ApplyQuartzComposition(const char* compositionName, const CGImageRef srcImage);

Pretty simple so far! Copy this in a header file (QuartzComposer.h, for instance) and add it to your application.

A small addition

As-is, our composition cannot be used. You will make some minor modifications to it to help run it from our application.

First, you will add an intermediate, “do-nothing” image transformation.

  • Disconnect your source image from the “Color Monochrome” and “Source Atop” filters, by dragging the tail end of the connexion away from the little dot labeled “Image”.

    The glowing image should disappear from the output window. This is expected.

  • Drag an “Image Transform” patch from the patch list into your composition
  • Do not change the default parameters of this new patch. We simply want a “do-nothing” transformation.
  • Connect the source image to the “Image” input (on the left) of the new Image Transform patch
  • Connect the “Transformed Image” output of the new Image Transform patch to both the Color Monochrome, and Source Atop patches.

    The glowing image should re-appear in the output window.

When you are done, you should have something like this:

Published outlets

The last thing to do is to to indicate in our composition where the source image is set, and where the resulting image can be copied.

If you control-click on any patch element of a composition, a contextual menu with the text “Published Inputs” and “Published Outputs” will appear. They will be disabled if there are no inputs or outputs. For instance, the source image you dragged in (on the left) has no inputs, and a Billboard has no outputs.

Using this technique, change the name of the published input “Image” of the Image Transform patch to “SourceImage”. The input’s name should now be “SourceImage” (with quotes), indicating that it is now a “named” input.

But my picture disappeared!

Right. As soon as you named the Input, the image was disconnected because a Quartz Composition cannot accept multiple inputs. It’s either a named input, or a connexion. This is expected.

Finally, name the output image of the “Source Atop” patch to “OutputImage”. Notice that the link to the Billboard was not severed, because outputs can be split.

Save your composition, with its named inputs and output, to a file called Glow.qtz.

Adding the composition to your application as a resource

Your application is probably built in Xcode, in which case you have a “Copy Resources” build phase. Simply add the Composition Glow.qtz to your project as a resource, and make sure it is added to this Copy phase. When you build your application, check the Contents/Resources folder in your bundle: the composition should have been copied there.

Actual code

You declared a function called ApplyQuartzComposition(const char*, const CGImageRef) above. Here is the code to this function:

#import "QuartzComposer.h"
#import <Quartz/Quartz.h>

CGImageRef ApplyQuartzComposition(const char* compositionName, CGImageRef srcImage)
{
  // Start with no image
  CGImageRef resultImage = NULL;

  // If you have a Cocoa application, you don't need an autorelease pool,
  // but having an extra one does not hurt because pools can be nested.
  NSAutoreleasePool* pool = [NSAutoreleasePool new];

  // Load the Quartz Composition by name. You copied it to your app's Resources folder above.
  NSString* compName = [NSString stringWithCString:compositionName];
  NSString* compositionPath =  [[NSBundle mainBundle] pathForResource:compName ofType:@"qtz"];

  // Quartz Compositions are run in an OpenGL context. Here's how to declare one.
  // This code inspired by http://lists.apple.com/archives/Quartzcomposer-dev/2005/May//msg00136.html
  NSOpenGLPixelFormatAttribute attributes[] = {NSOpenGLPFAAccelerated, NSOpenGLPFANoRecovery, (NSOpenGLPixelFormatAttribute)0};
  NSOpenGLPixelFormat* format = [[NSOpenGLPixelFormat alloc] initWithAttributes:attributes];
  NSOpenGLContext* context = [[NSOpenGLContext alloc] initWithFormat:format shareContext:nil];

  // We use Objective-C exceptions because if:
  // - there is no context (which happens on a non-Quartz-Extreme graphics card), or
  // - you forgot to name your inputs and outputs, or
  // - you made a typo (hence they are not found),
  // an exception is thrown and we want to catch it and return a NULL image.
  @try
  {
    // Create the Renderer object that will play back our composition
    QCRenderer* renderer = [[QCRenderer alloc] initWithOpenGLContext:context pixelFormat:format file:compositionPath];
    // Set input values. You could get a complete list with [renderer inputKeys].
    [renderer setValue:(id)srcImage forInputKey:@"SourceImage"];
    // Run composition. Finally!
    [renderer renderAtTime:0.0 arguments:nil];
    // Retrieve composition output results. You could get a complete list of outputs with [renderer outputKeys].
    NSImage* image = [renderer valueForOutputKey:@"OutputImage"];
    if (image)
    {
      // Convert NSImage to CGImageRef, our return type
      CFDataRef imgData = (CFDataRef)[image TIFFRepresentation];
      CGImageSourceRef imageSourceRef = CGImageSourceCreateWithData(imgData, NULL);
      resultImage = CGImageSourceCreateImageAtIndex(imageSourceRef, 0, NULL);
    }
    [renderer release];
  }
  @catch(id exception)
  {
    NSLog(@"Error running Quartz Composition '%s': %@", compositionName, exception);
  }

  // Done, clean up
 [context release];
  [format release];
  [pool release];
  
  return resultImage;
}
  

Copy this to a source file (QuartzComposer.mm, for instance) and add it to your application.

You should now be able to apply a Quartz Composition by name in your application. Enjoy!
Categories: Carbon+Cocoa, Development, Graphics Tags: